Anúncios
Staring at a scratched wooden dresser in a crowded charity shop usually makes most renters walk away immediately. You see the ugly orange varnish and terrible wooden knobs from the 1980s. You assume the bulky piece belongs in a landfill instead of your modern apartment. Learning how to upcycle old furniture completely flips this script. You start seeing the solid structural bones hiding underneath the ugly exterior finish.
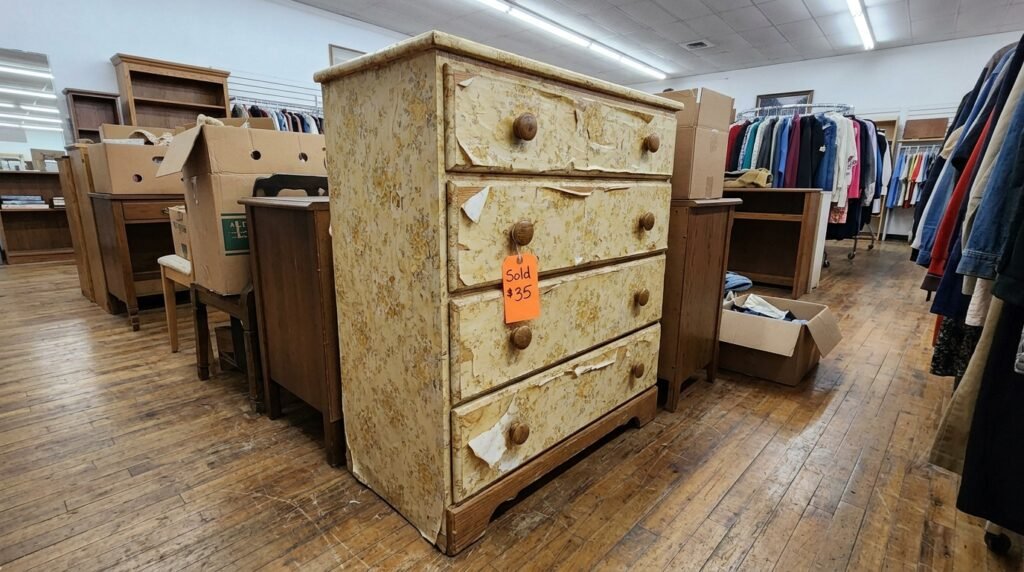
I spent a Saturday morning at the ARC Thrift Store on South Broadway looking for a cheap bedroom dresser. I spotted a heavy oak chest of drawers covered in hideous floral contact paper for exactly thirty-five dollars. Lugging that heavy wooden box up to my Denver apartment felt like a massive mistake at the time. I quickly realized that a simple weekend project could turn it into a high-end designer piece.
The basic tools required to upcycle old furniture properly
You do not need an entire garage full of expensive power tools to complete this project. You just need a few basic supplies from the local hardware store. Buying the correct materials upfront prevents massive headaches during the actual painting process.
Grab a pack of 220-grit sandpaper and a good quality angled synthetic paint brush. You also need a small high-density foam roller to prevent ugly brush strokes on the flat side panels. Attempting to upcycle old furniture with cheap dollar store brushes leaves terrible loose bristles stuck permanently in your wet paint.
Setting up a safe indoor workspace
Renters rarely have access to a private driveway or a heavily ventilated garage. You must set up a safe workspace directly inside your living room or dining area. Buy a heavy canvas drop cloth to protect your rental carpet from accidental spills.
Anúncios
Open every single window in the apartment and turn on a box fan to keep the air moving constantly. You must prioritize your lung health when working with chemical primers inside a tight studio.
Cleaning the surface thoroughly
Old wooden pieces carry decades of gross human oils and heavy furniture polish. Paint absolutely refuses to stick to a greasy wooden surface. You must scrub the entire piece down with a strong degreasing dish soap before you do anything else.
Let the wood dry completely overnight after you scrub it clean. Skipping this boring preparation step guarantees your new paint job will peel off in giant flakes within a month. Sourcing items with good flat surfaces helps immensely, which you can read about in the best thrift store finds for home decor (and what to skip).
Preparing the hardware holes to upcycle old furniture
Vintage dressers often feature hardware with really weird spacing between the mounting screws. Modern brass pulls rarely fit into those exact same holes. You have to fill the old holes completely before you can drill new ones.
Here is a highly specific trick that saves your entire project. Buy a small tube of stainable wood filler and overfill the existing holes slightly. Let the putty dry completely rock hard and then sand it perfectly flush with the drawer front.
Removing stubborn old hardware safely
Sometimes the original screws completely rust inside the old wooden drawer fronts. They refuse to budge when you attack them with a standard handheld screwdriver. You need a little bit of physical leverage to break the tight rust seal.
Place a thick rubber band flat over the head of the stripped screw before inserting your screwdriver. The rubber grips the stripped metal perfectly and gives you the exact traction needed to twist it out. This trick saves you from drilling out broken screws entirely.
Drilling for the modern metal handles
Once the old holes disappear under the filler, you can measure for your new metal handles. Buy a cheap plastic cabinet hardware template from Amazon for five dollars. This simple plastic guide ensures every single handle sits perfectly level across all the drawers.
Trying to eyeball the hardware placement always ends in crooked metal pulls. A plastic template takes the mathematical guesswork out of the entire installation process.
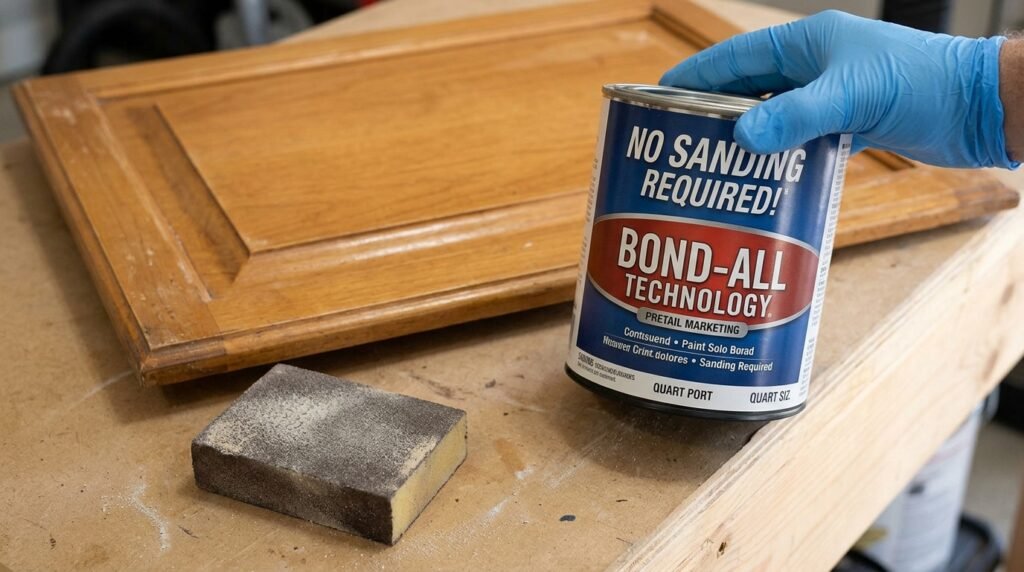
Why sanding is crucial when you upcycle old furniture
Many modern paint brands claim you can skip sanding completely before applying their products. I strongly advise against believing this specific retail marketing tactic. A light scuff sand gives the new paint microscopic grooves to grab onto tightly.
You just need to run your 220-grit sandpaper quickly over the entire surface by hand. You do not need to strip the wood down to its raw natural state. Wipe all the resulting dust away with a slightly damp microfiber cloth.
A completely dust-free surface ensures a glassy smooth finish for your final coats of paint. Skipping this dusty step ruins the texture of the final product.
The danger of chemical strippers indoors
You might see internet videos showing people pouring thick chemical strippers over vintage wood. Never use these highly toxic products inside a closed apartment building. The harsh fumes linger for days and can make you incredibly sick.
Sticking strictly to light manual sanding and high-quality bonding primers keeps your air quality safe. You do not need to expose your pets or your neighbors to harsh industrial solvents just to change a paint color.
Applying the blocking primer
Ugly orange wood contains heavy chemical tannins that bleed directly through light paint colors. You paint a white layer and wake up the next morning to see yellow stains seeping through. A heavy stain-blocking primer stops this chemical reaction completely.
According to the paint professionals at The Spruce, using a high-quality bonding primer guarantees maximum adhesion on tricky glossy surfaces. Roll on one thin coat of primer and let it dry for the recommended time printed on the can.
Choosing the right paint to upcycle old furniture
Flat wall paint chips incredibly easily and holds onto greasy fingerprints permanently. You must buy paint formulated specifically for heavy daily cabinetry or interior trim work. These specific formulas dry to a hard, durable shell that withstands daily physical abuse.
I prefer using a satin or semi-gloss finish for high-traffic items like a bedroom dresser or a TV console. The slight sheen reflects the natural light beautifully and wipes clean with a standard damp sponge.
Finding the right color takes time, but matte black or dark sage green always look expensive. Darker colors hide minor wood imperfections beautifully when you upcycle old furniture on a tight weekend schedule.
Spray paint versus canned paint
Many beginners gravitate toward cheap aerosol spray paint because it seems significantly faster. Spraying furniture inside an apartment coats your entire living room in a fine mist of colored dust. The overspray travels much further than you think and lands directly on your white walls.
Using a foam roller keeps the paint exactly where it belongs and leaves absolutely zero airborne mess. Rolling takes a little more physical time but guarantees your security deposit remains completely safe.
The thin coat application method
Slapping on one massive thick layer of paint creates terrible drips and ugly sags. You must apply three incredibly thin coats using your small foam roller. Thin coats dry much faster and create a professionally sprayed look.
Let each layer dry completely before starting the next round. Rushing this step pulls the wet paint right back off the wood and ruins the smooth texture completely.
Selecting modern hardware to finish the piece
The hardware acts as the actual jewelry for your freshly painted wooden box. Cheap plastic knobs bring the entire aesthetic of the room down instantly. Heavy metal hardware masks the cheap thrift store origins perfectly.
You can find gorgeous brushed brass bar pulls online for a fraction of the boutique price. The warm brass contrasts beautifully against dark moody paint colors like navy blue or forest green.
If you feel unsure about mixing metal finishes in your room, explore how to mix and match furniture styles without it looking wrong. Matching your new drawer pulls to your existing lamp bases creates a highly cohesive design.
Protecting the surface with a topcoat
A painted top surface takes a massive beating from heavy keys and wet water glasses. You need to protect your hard work with a clear protective sealant. Water-based polycrylic provides a crystal clear shell that never turns yellow over time.
Apply two very thin coats of polycrylic over the top surface using a clean synthetic brush. This final protective step ensures your project survives the daily reality of living in a small apartment.
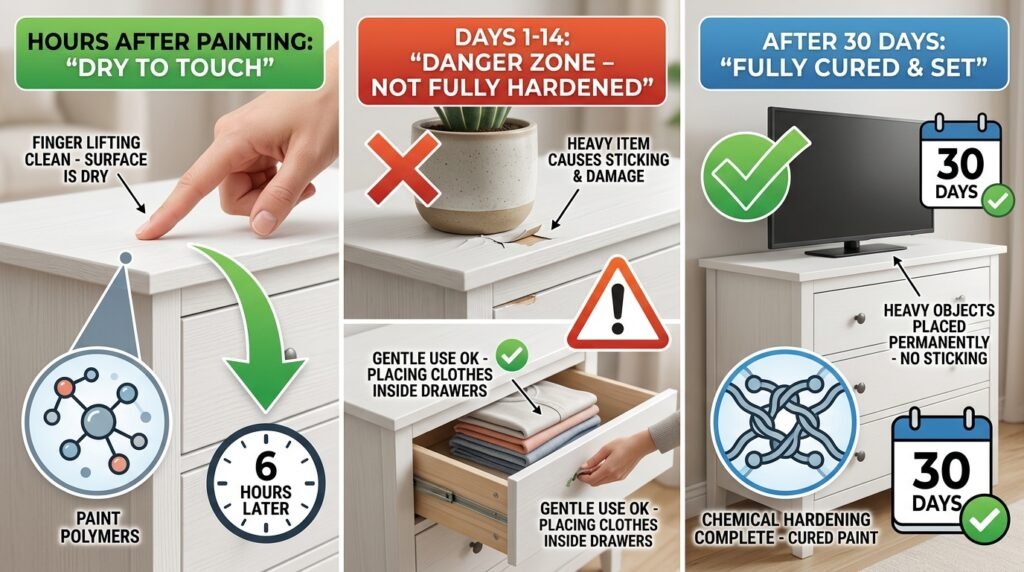
Letting the piece cure before daily use
Paint feels dry to the human touch within a few short hours of application. Feeling dry does not mean the chemical structure has actually hardened completely. This invisible chemical hardening process takes nearly thirty full days.
According to the cleaning experts at Apartment Therapy, placing heavy objects on freshly painted surfaces causes the items to stick permanently. You must wait at least two weeks before placing heavy televisions or ceramic planters on the top.
You can gently place your clothing inside the drawers after a few days. Just treat the exterior surface very carefully during that initial thirty-day curing window.
The financial reality of DIY projects
Buying a brand new solid wood dresser easily costs over eight hundred dollars today. Most renters settle for flimsy particleboard furniture that falls apart during the very first move. Choosing to upcycle old furniture gives you solid wood pieces for a fraction of retail prices.
My thrifted ARC dresser cost thirty-five dollars for the wood and forty dollars for the paint supplies. I built a heavy custom furniture piece for under eighty dollars total. It survived my last three apartment moves without a single scratch.
Expanding your skills to other empty rooms
Once you conquer a basic wooden dresser, you can tackle almost any ugly item in your home. You start looking at boring wooden dining chairs and ugly nightstands with massive creative potential. The confidence you gain spills over into every single room.
If you need more budget strategies for empty rooms, check out how to decorate a living room when you’re starting from zero. A few painted accent pieces fill up a blank space beautifully on a tight budget.
Grabbing a cheap foam roller and a can of bonding primer empowers you to take complete control of your living space. Save massive amounts of money while building custom wooden pieces nobody else owns. Take a chance on that ugly wooden dresser this Saturday morning and finally upcycle old furniture to match your exact personal style.

Fabiana Moura is a decor enthusiast and renter based in Denver, CO. After five moves in eight years, she became obsessed with making small spaces feel like home — without renovation, without a big budget, and without losing the security deposit. At Inovaty, she shares everything she’s learned along the way.