Anúncios
Staring at that awkward twelve-inch gap between the top of the cupboards and the ceiling feels incredibly frustrating. Dust collects up there alongside forgotten holiday platters and sticky cooking grease. Leaving it totally empty makes the room look cold and unfinished. Shoving random cardboard boxes up there makes your entire cooking space look like a messy storage unit. Figuring out how to decorate above kitchen cabinets solves this massive aesthetic problem without spending much money.
I ignored the massive gap in my first Denver apartment for almost two years. I finally went to the Target on Colorado Boulevard and bought three seagrass baskets for fifteen dollars each to hide my messy baking supplies. Sliding those matching woven baskets into that empty void completely changed the entire atmosphere of the room. You just need a solid plan and a few inexpensive pieces to make that dead space work for you.
Before you decorate above kitchen cabinets: The mandatory deep clean
You cannot successfully decorate above kitchen cabinets if the surface remains covered in thick layers of grime. Cooking oils float upward constantly and settle directly onto the flat wood. This creates a sticky trap for everyday household dust and pet hair. You must scrub the entire surface down with a strong degreasing dish soap before you buy any decor.
Let the wood dry completely overnight after you scrub it clean. Placing nice baskets onto a sticky surface ruins the material and makes everything smell terrible. You must start with a perfectly clean slate to achieve a high-end look.
The genius wax paper trick
Here is a highly specific trick that saves you hours of future cleaning time. Roll out a long sheet of standard wax paper and lay it completely flat across the top of the wood. The wax paper catches all the floating cooking grease and dust over the next few months.
Anúncios
You never have to scrub the heavy wood with harsh chemicals ever again. You just carefully roll up the dirty wax paper twice a year and throw it in the trash. Replace it with a fresh sheet before putting your beautiful decorative items back into place.
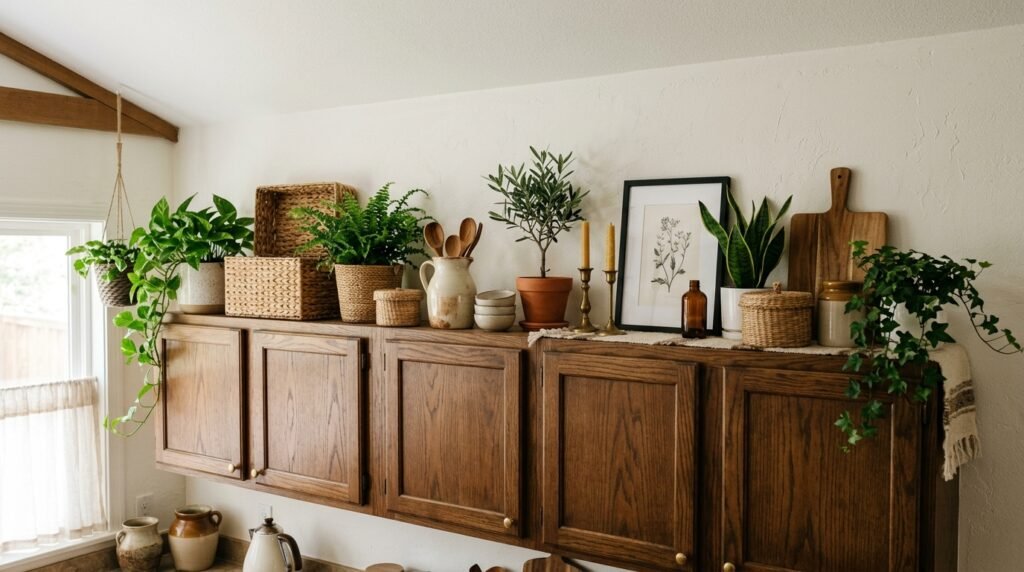
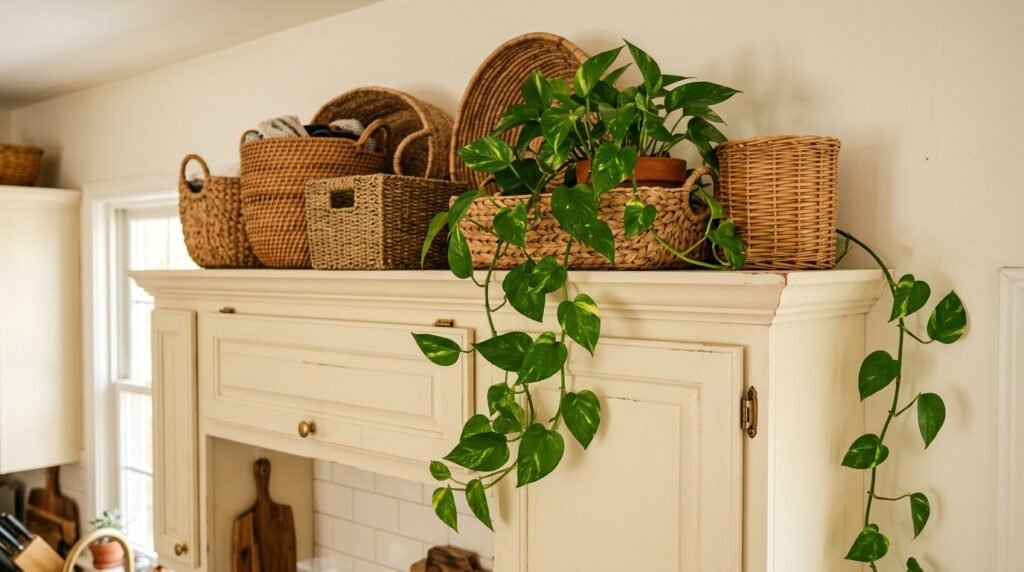
Step 1: Hide ugly appliances in woven baskets
Counter space acts as your absolute most precious commodity in a tight rental unit. Keeping a bulky black blender and a massive slow cooker on the counter makes your prep area look cluttered. You need to hide these heavy seasonal appliances to maintain a clean aesthetic while cooking dinner.
Moving rarely used appliances upward creates massive functional space for chopping fresh vegetables. This strategy forms the core foundation of understanding how to organize a tiny kitchen without extra cabinets. You just pull the heavy basket down once a month when you actually need to use the food processor.
Finding the right storage containers
Measure the exact height of the gap before you drive to the store. You want the baskets to fill the space almost completely without scraping the painted ceiling. Square or rectangular baskets maximize the interior storage volume much better than round containers.
I prefer natural materials like water hyacinth or thick woven seagrass for these upper zones. The natural grass texture breaks up the endless wooden doors beautifully and adds a soft, organic element to the room. They also hide the ugly black appliance cords completely out of sight.
Step 2: Display your largest cutting boards
When learning how to decorate above kitchen cabinets, you must prioritize large scale over small details. Tiny items get completely lost when viewed from the floor and just look like accidental clutter. You need massive, heavy objects to command attention from across the room.
Oversized wooden cutting boards and heavy ceramic serving platters fit this requirement perfectly. Most renters struggle to store these awkward items in standard base drawers anyway. Moving them to the highest point in the room solves a major storage headache immediately.
Leaning objects safely against the wall
You cannot just lean a heavy piece of wood against the drywall and hope it stays upright. The vibrations from opening and closing the doors below will eventually cause the board to crash down. You must secure the heavy items to prevent a dangerous accident in your cooking area.
According to the design experts at Apartment Therapy, placing a small rubber mat under the edge of leaning items prevents them from slipping forward. You can also place a heavy book directly in front of the cutting board to act as a hidden structural stop.
Step 3: Add organic energy with fake trailing plants
Real houseplants absolutely despise the environment sitting right above your hot stove. The temperature fluctuates wildly and the cooking grease clogs the pores on their delicate green leaves. Watering a heavy ceramic pot that sits seven feet off the ground also creates a massive logistical nightmare.
You must use high-quality artificial plants to bring natural energy into this specific high-altitude zone. Fake plants require zero maintenance and never drop messy dead leaves into your morning coffee.
Styling the plastic vines correctly
Buy a faux golden pothos from IKEA and place the plastic nursery pot inside a nice ceramic planter. Place the planter near the outer edge of the wood and let the long plastic vines drape down the side. This cascading effect breaks up the harsh right angles of the furniture beautifully.
Many renters struggle to decorate above kitchen cabinets because they keep everything pushed flat against the back wall. Bringing the vines forward toward the room creates a necessary sense of physical depth. It makes the entire structure feel much more integrated into your daily living space.
Step 4: Install battery-operated lighting
Dark architectural gaps often look exactly like massive black holes swallowing the top of your room. Relying entirely on the harsh overhead apartment fixture guarantees terrible shadows across your upper display. You need a dedicated pool of warm light pointing directly at your new decorative pieces.
Another brilliant way to decorate above kitchen cabinets involves installing cheap puck lights. You do not need an electrician or complicated hardwiring to achieve a custom glow. Battery-operated LED light bars cost about twenty dollars online and solve this dark problem instantly.
Hiding the light fixtures perfectly
Stick the lightweight plastic light bars directly behind the front lip of the cabinet trim. The trim hides the actual plastic fixture from view while allowing the warm light to wash across the back wall. This upward glow makes the standard ceiling feel much taller than it actually is.
Writers at The Spruce constantly recommend layering different light sources to make a room feel expensive. Exploring how to make a dark apartment feel brighter without more windows relies heavily on these hidden battery fixtures. You just pop the light bar off the magnetic mount to recharge it every few weeks.
Step 5: Treat the gap like a mini art gallery
Blank drywall above the cupboards feels very sterile and totally lacks personal character. Leaning framed artwork against the back wall turns a boring storage area into an intentional design feature. It brings unexpected color and personality to a highly utilitarian space.
You want to select wide landscape pieces rather than tall vertical frames. A horizontal orientation fills the awkward rectangular gap much better and feels highly proportionate to the furniture below it.
Selecting the right thrifted artwork
Never place expensive original paintings or delicate watercolors near a hot stove. The steam from boiling pasta water will eventually warp the expensive canvas and ruin the expensive paint. You must use cheap thrift store prints or basic typography posters behind thick glass frames.
I bought a vintage coffee advertisement print at a local charity shop for three dollars. The glass protects the cheap paper from the cooking humidity perfectly. You just wipe the glass frame down with basic window cleaner once a month.
What to completely avoid when you decorate above kitchen cabinets
You can ruin your entire aesthetic very quickly if you ignore the basic rules of visual scale. The most common mistake involves lining up twenty identical small items in a perfectly straight row. This arrangement always looks like a weird retail store display rather than a cozy home.
You must group items together in small clusters of three and leave intentional empty space between the groups. The negative space allows your eyes to rest and makes the displayed objects look highly important.
The absolute danger of tiny clutter
Placing fifteen small coffee mugs or tiny ceramic figurines up high creates immediate visual stress. It looks exactly like a hoarding situation and makes the room feel incredibly messy. This cluttered approach directly contradicts the core principles of how to style open shelves in a kitchen without it looking cluttered.
You can easily decorate above kitchen cabinets by sticking to a strict limit of three to five large statement items. A single massive woven basket looks a hundred times better than a dozen tiny glass jars. Editing your collection aggressively remains the absolute secret to high-end budget design.
Matching your existing room aesthetic
Building your own custom display means you control the exact color palette completely. You never have to settle for the weird generic decor sold at big box retail stores. You can paint your thrifted picture frames to match your existing baseboards exactly.
This creates a brilliant cohesive look where the upper decor feels naturally connected to the floor. I keep my personal aesthetic very warm with lots of natural wood tones and matte black metal. Finding the right objects allows me to maintain this cohesive style on a tight budget.
Building your creative confidence safely
Testing these specific ideas builds massive confidence for tackling larger apartment projects later. You start looking at weird architectural gaps as an opportunity rather than a strict limitation. Keeping the objects cheap and large removes the intense fear of failure completely.
If you accidentally hate the vintage sign you bought, you just donate it back to the thrift store. Always use a sturdy step ladder when placing heavy items onto high surfaces. Safety must always remain your top priority when lifting heavy ceramic trays over your head.
Grab a tape measure tonight and verify the exact height of the void sitting over your stove. Prepare to decorate above kitchen cabinets this weekend using items you already own or cheap thrift store finds. Taking control of this awkward space makes your rental feel highly customized and beautifully finished.

Fabiana Moura is a decor enthusiast and renter based in Denver, CO. After five moves in eight years, she became obsessed with making small spaces feel like home — without renovation, without a big budget, and without losing the security deposit. At Inovaty, she shares everything she’s learned along the way.