Anúncios
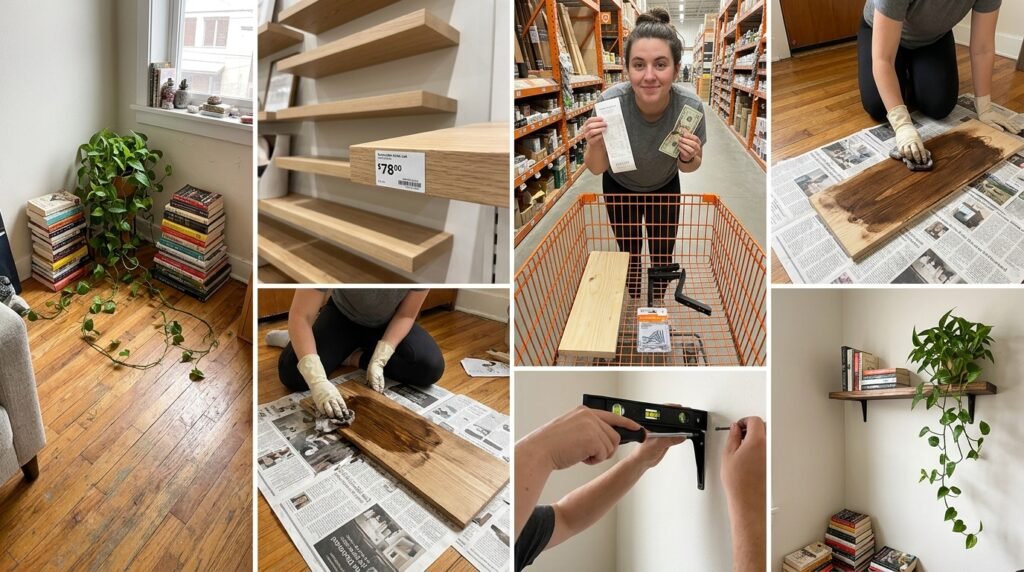
Stacking books on the floor eventually stops looking bohemian and simply looks messy. You run out of flat surfaces incredibly fast in a cramped rental apartment. Buying pre-made storage solutions drains your bank account quickly.
Popular home decor stores sell beautiful minimalist wall storage. They also charge fifty to eighty dollars for a single piece of basic wood. You can replicate that exact look for less than the cost of a standard takeout lunch.
When I rented a tiny unit near Cheesman Park here in Denver, I desperately needed a place to put my growing pothos plant. My single window sill sat completely full. I walked into the local Home Depot with twenty dollars and a tape measure.
I quickly realized building basic wall storage requires zero carpentry skills. You just need the right hardware and a little patience. Let us walk through the exact process to build a sturdy shelf on a strict budget.
Gathering materials for your DIY floating shelf
You need to buy two heavy-duty steel L-brackets first. These usually cost around four dollars each in the basic hardware section. Choose matte black or brushed brass brackets depending on your existing room decor.
Anúncios
Next, you need to purchase the actual wood. Walk down the lumber aisle and look for common pine boards. A standard one-inch by six-inch pine board costs about six dollars for a long piece. Pine represents the cheapest and lightest option for apartment walls.
You will also need a small piece of medium-grit sandpaper. Grab a small pack of heavy-duty drywall anchors and their corresponding screws. You likely already have a basic Phillips-head screwdriver and a hammer in your apartment.
The secret to getting your wood cut for free
Most renters do not own a circular saw. Storing heavy power tools in a tiny apartment makes zero practical sense. You actually do not need to cut the wood yourself at all.
Take your long pine board directly to the lumber desk at the hardware store. Tell the employee the exact length you need for your specific wall. They will cut the board for you on their massive panel saw.
The first two cuts are almost always completely free at major hardware stores. This service saves you from buying expensive tools you will rarely use. It also keeps dirty sawdust out of your clean living space.
Prepping the raw wood surface
Raw pine boards straight from the store feel rough to the touch. They often have tiny splinters along the freshly cut edges. You must smooth these edges out before hanging the board on your wall.
Tear off a square of your medium-grit sandpaper. Wrap it tightly around a spare block of wood or a thick hardcover book. This creates a makeshift sanding block that makes the job significantly easier on your hands.
Rub the sandpaper firmly along all the flat sides and the sharp corners. You want the edges to feel completely smooth when you run your hand across them. Wipe the entire board down with a slightly damp cloth to remove the lingering dust.
Choosing between paint and wood stain
You can leave the smooth pine bare for a raw, Scandinavian look. However, adding color makes the cheap wood look much more expensive. You have to decide between painting the board or using a traditional wood stain.
Stain highlights the natural grain of the wood beautifully. You can buy a tiny half-pint can of walnut stain for about five dollars. Wipe it on with an old cotton t-shirt and let it dry outside on your balcony.
Painting offers a completely different aesthetic. You can paint the board the exact same color as your apartment walls. This makes the storage blend in perfectly and gives the illusion of custom built-in architecture.
Finding the right spot on your wall
Deciding exactly where to hang your new storage takes a bit of planning. You want to maximize your unused vertical real estate. Utilizing high walls effectively is a critical concept if you want to master vertical space: the most underused trick in small apartments.
Hold the finished wooden board flat against the wall. Step back and look at the placement from across the room. Ask a friend to hold it so you can verify the height feels natural.
You generally want to hang things at eye level in living areas. If you are mounting this above a desk, leave at least twenty inches of clearance. You need enough room to open your laptop comfortably underneath it.
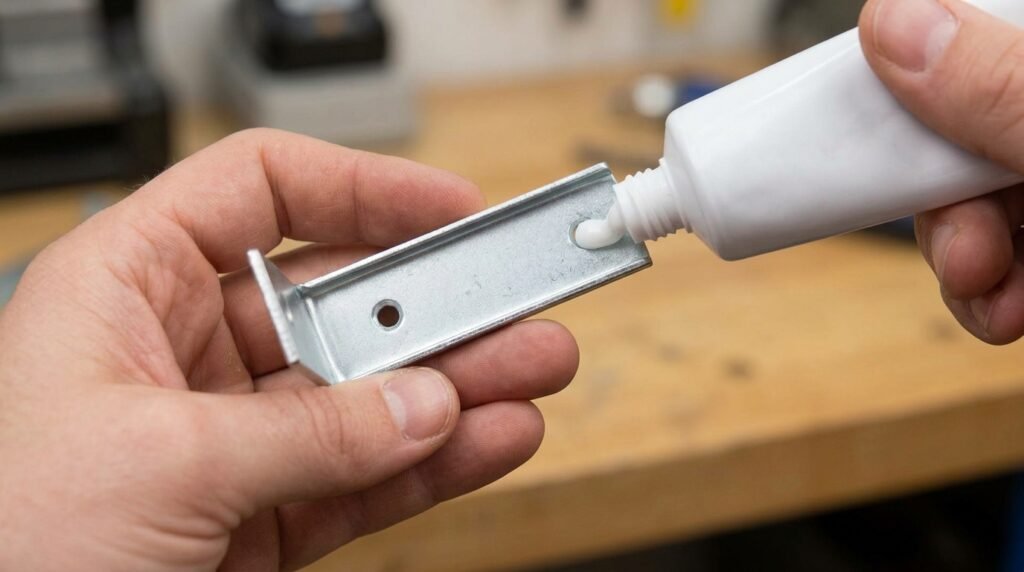
The toothpaste trick for marking drill holes
Marking the exact spot to put your screws often causes extreme frustration. Trying to hold a heavy metal bracket, a level, and a pencil at the same time proves difficult. I use a highly specific trick to make this process foolproof.
Put a tiny dab of standard white toothpaste on the back of the bracket directly over the screw holes. Press the bracket firmly against the wall exactly where you want it to go.
Pull the metal bracket straight back toward you. The toothpaste leaves two perfect little white dots on your painted drywall. Those dots tell you exactly where you need to place your screws or your wall anchors.
Installing the hardware properly
You need to ensure your brackets are perfectly straight before securing them. A crooked board looks terrible and causes round objects to roll right off the edge. Download a free bubble level application on your smartphone to check your work.
Place your phone flat against the top of the metal bracket. Adjust the angle until the digital bubble sits exactly in the middle. Press the bracket into the wall to leave your toothpaste marks.
If your marks happen to land on a wooden wall stud, you can drive the screws straight in. Most times, you will hit hollow drywall instead. This means you must use plastic anchors to keep the metal hardware from ripping out of the wall.
Using drywall anchors to protect your lease
Skipping the wall anchors guarantees your new storage will eventually crash to the floor. Drywall simply cannot hold the weight of wood and books on its own. Using proper anchors actually protects the wall from massive, tearing damage.
Take a hammer and gently tap the pointy end of the plastic anchor into your toothpaste mark. Use your screwdriver to twist the anchor the rest of the way into the drywall. It should sit completely flush with the painted surface.
You can now hold your bracket over the anchor and drive the metal screw inside. The anchor expands behind the wall, locking the hardware tightly in place. Proper installation is crucial when learning how to decorate a rental apartment without losing your deposit.
Securing the board to the brackets
Once both metal brackets are firmly attached to the wall, place your prepared wood on top. Center the board perfectly between the two metal supports. Take a step back and make sure the overhang looks even on both sides.
Most L-brackets have small holes on the top horizontal bar. You need to drive tiny wood screws upward through these holes directly into the bottom of the pine board.
This final step locks the wood in place permanently. It prevents the board from sliding forward or tipping if you accidentally bump it. Your new custom wall storage is now completely finished and incredibly secure.
Styling your new DIY floating shelf
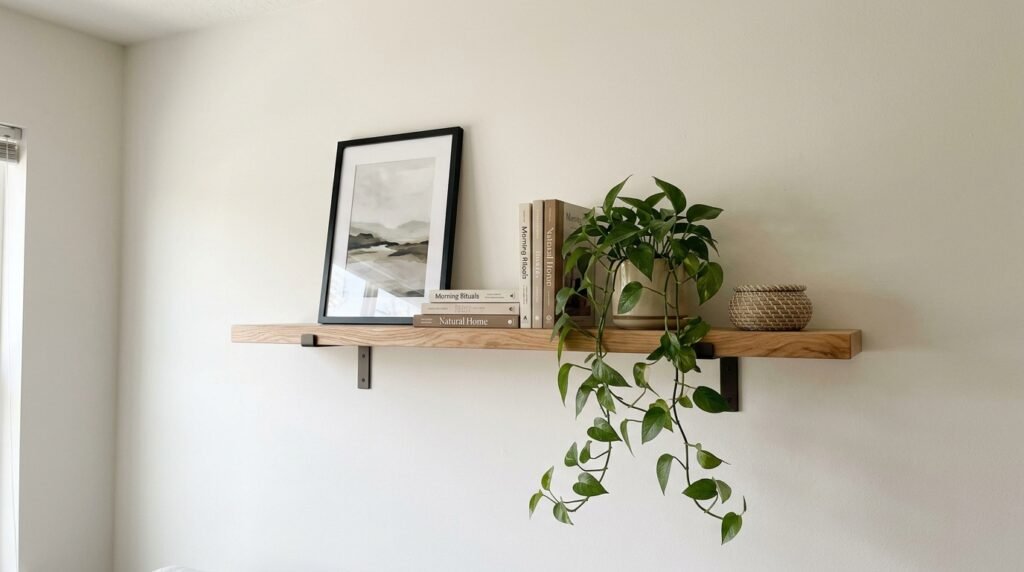
An empty board looks sad and unfinished on a large wall. You need to add carefully chosen items to make it feel intentional. Avoid treating this new flat surface as a dumping ground for random daily clutter.
Mix tall items with short items to create visual interest. Lean a framed piece of art against the wall to add necessary height. Place a small, trailing plant next to it to soften the rigid wooden angles.
Do not pack the surface completely full of objects from edge to edge. Leave empty space between your books and your decorative Target baskets. If you need specific visual formulas, check out how to style open shelves in a kitchen without it looking cluttered.
Hiding the ugly metal hardware
Some people dislike the look of exposed metal brackets underneath the wood. You can disguise the hardware easily through clever styling. Simply place trailing plants like a pothos or a philodendron directly above the metal supports.
The long green vines will drape down naturally over the front edge of the wood. You can gently guide the leaves to cover the dark metal brackets entirely. It softens the entire look and makes the wood appear to float magically on the wall.
Enjoying your budget-friendly upgrade
Building things with your own hands brings a deep sense of satisfaction. You created a functional, beautiful piece of furniture for less than fifteen dollars. You solved a frustrating storage problem without relying on expensive catalog stores.
You now know how to navigate the lumber aisle with confidence. You know how to use drywall anchors securely and safely. These specific skills will help you upgrade every single apartment you ever rent in the future.
Walk through your apartment and find one empty wall that desperately needs organization. Buy your brackets today, measure your space, and get your pine board cut this weekend.

Fabiana Moura is a decor enthusiast and renter based in Denver, CO. After five moves in eight years, she became obsessed with making small spaces feel like home — without renovation, without a big budget, and without losing the security deposit. At Inovaty, she shares everything she’s learned along the way.